Showing posts with label pincushion. Show all posts

Wednesday, 7 March 2018

last swap

I joined a group a wee while back, and have had a few swaps with them. Sadly the numbers swapping have diminished, so now the swaps are done. Not enough folk happy to make and post off to who knows where for the joy of an exchanged swap. So, my final offering for this group was
'Put a Bird on it... and in it!'
 I found amazing glorious rich fabric with a bird, just perfect for putting a porthole into, and showcasing the little chap


I love a sneak peek, so I out up this picture and my partner quickly responded, so I was certain she liked where I was going.  The blue linen I had had for another task, so it was a simple choice to make, and I had a pretty variegated thread which pulled up the colours in the bird fabric.

 I saw a tutorial on youtube, which showed how to make a pouch with multiple pockets. I vaguely followed that, but made my own dimensions, so this ends up with two large pockets, one small zipped pocket and two slips between the small zip pocket and the larger pockets. All fastened with one large zip across the top.


To put a bird in it I looked at owl pincushions here there and everywhere... I looked at how they were constructed and then off I went and redesigned the dimensions to make my own version- thank you everyone out there who has published their own versions!

Basically, you draw an isosceles triangle, then a shorter fatter one. Cut from chosen fabric.  Match the bottom edges, and sew one to t'other, and then sew the other side, wrong sides out , also stitching the top part of the larger one. Flatten him out, and trim the point, then turn. Fold down the top point and stitch firmly to the middle of his tummy. Gather stitch round the base.

Cut out a suitable size cardboard circle- I use the famous cereal packet for this- and cut a circle of fabric for the base about an inch larger in diameter. I then interfaced this circle, and gather stitched the edge, and pulled it in carefully round the card. Press like mad.

Now stuff your Wol, as fat and firm as you please. I used polyester filling, but walnut shells are probably better- just a major dirth of these in my house- and hand stitch the base to Mr Wol. Plump him up, add suitable eyes, and you are done. He is a really quick make.

Confession time- I meant his feathers to point down, but cut him wrong... so he has slanty feathers. Sorry partner.. But she is quirky.   She has been named Georgina, by her new human. Most suitable I think!


I was rather chuffed with the finish. I think there may be one or two more of these before I am done...

  When I was making my pouch I managed to make a boo-boo. I put my bird in facing the wrong direction. hey, it happens. So now, I have a piece that needs using, but is not quite what had been planned.

A few years ago I got a book- given? bought? not sure. called something like Zakka style.. This wallet was in it. not quite the same size, but I adapt most things, so a variation on the theme of the zakka style wallet appears.
I love how it opens out quite flat. You can see my birds facing away from one another. It works for this though!


Again, I think a few more of these may appear shortly.


A couple of owl buttons, and a few other sundries, and my parcel was ready to wing it's way across the Atlantic, which it managed in just under a week...

My partner has received her package, and seems to like it!

This was a secret partner swap, so nobody knows who is sending to them...  Sneaky swap mamas gave us each other! Fantastic sneaky mamas!


I will blog about what I received soon! It was rather lovely... don't hold your breath though.. I am busy just now.. Costumes.

Monday, 20 June 2016

Thank you gift

 I went to Bonn at Whit bank holiday. Well, you see I have a friend over there, who puts up with me going, taking over her sewing machine, using her fabrics and generally making a nuisance of myself...
And while I was there she was involved in a workshop on Flying Geese.. 
and I was allowed to join these wonderful ladies. Everyone made their own take on the geese, and what they would do with their geese... But, of course, everyone brought their own sewing machine... except this strange visitor from overseas.

 She could not quite manage a machine in the hand luggage only.

But one lovely lady brought a spare, so I could also sew. I think what she did was, she brought her old and her new machine, and she used her old one and gave me the use of her new one! The kindness I received in Germany, I just do not know how to express it! it is just incredible.

So, a small thank you seemed appropriate.
If you pop across to her blog, you will see that she is quite a fan of neutrals, and does amazing things with her neutrals, so I felt a pincusion to attach to her machine was a half an idea- well I looked at her pile of pins next to her machine, and just, well it felt like the thing to do... So, I dug in my neutrals and produced this one, which she has now received. I think it may see some use.

Thank you lovely ladies for making me feel so welcome.

Sunday, 5 June 2016

Garden day

It is June already, and I have spent less time on the garden than I can ever remember.
The weather has managed to be perfect for the garden when I am at work, or away, and dire, when I have time to do it, or I have had another something urgent to deal with instead.
Today though?
I got into the garden.
I do not have a large garden, but still, I cannot get round all of it in one day, so I have to select an area, and go at it!
Results?

I managed to clip the edges of the grass on the lower bit of grass- I really cannot grace it with the title of 'lawn', there is more bugle and buttercup than there is grass really- and do some weeding and hoeing and digging. Then a pear tree which had lived in a pot for several years was transplanted into a cleared area. It put up a struggle, not wanting to leave it's cosy pot, but a bit of persuasion.... 

The allium there is a volunteer, and I shall not discourage it. I am very happy with it's personal life choices. A pretty clematis which had waited a year to be given freedom of the soil has also found a home now. I wanted to give it a teepee to climb, but it was not for letting go of it's little trellis, so, I suppose, I have to allow it. Various fuschias have also survived a long time in pots, so, hardy they must be, and I shall allow them garden freedom too. Then I just got some cheap summer bedding and popped that in to help brighten us up a bit. 

This is a difficult corner. It does get sun, but not until afternoon, and the rhubarb struggles, unlike it's cousin outside the back door, in the first picture. 

 these two pots had been emptied of their contents- dead summer bedding from two years ago, and I have refilled them, to give some cheer outside the living room
 Yes, well- there used to be trellis for these to climb, but it disintegrated in the winds a couple of years ago, and somehow, we just haven't got the 'Round Tuit' to sort it out. But secretly- not so secret now- I love the riotous behavior of these clematis. Last year was the first time the pink one flowered, and boy is it making up for lost time!
Yes, that volunteer again. Love the green seedheads contrasting with the purple. Love the not quite perfection of that sphere, it is just feisty enough to decline the sphere!

oh sewing? what do you mean sewing?? 

Oh that bit! I did some sewing over the bank holiday weekend, but failed to take the pictures, but I was in Germany, and someone else took pictures!  If you pop over to her blog, she will show you. 

And since I came back I have made a couple of bits, Here is the second one, 
  a pin cushion for someone in USA, who has been very kind and generous to me. She will find out when it arrives, but, I think she does not follow me, so it should be a complete surprise.


And here, I have put it onto my machine, just for show.

There is more, but really, this is enough for one day!

Back soon, I hope!

Monday, 20 April 2015

A pincushion for your machine, and a small giveaway!

You saw the pincushion I made for my swap partner, and the one I made for myself, which happily fasten round the sewing machine? I have promised to write up a tutorial for this, so you may make one for yourself- if you do, please tell me, I would love to see your results!

This is the one I made originally, because I end up with a pile of pins beside my machine, and a scattering of them on the floor- I needed that pinnie ON the machine...
So, I made a few more for favoured people... including this one for my Tote bag swap partner...

And it seemed sensible to write  a tutorial for it- You can just make it up as you go along, after all, that is exactly what I did... Or you can follow a set of instructions...


This is a perfect pattern for using a few scraps!

So, what do you need?

Those scraps!

Some elastic, long enough to go round your machine, with a little tension on it,

Stuffing for the pin cushion

a button,
some wadding- tiny offcut- you shall see...

co-ordinating thread

snap fasteners


Ready to go?

Cut
4.5" square- for the back
2 coordinating strips, one each 2.5" wide by 5" long
strip about 30" long ( may vary, according to your machine-more later) 2.5" wide
Strip 2.5" wide by 5" long.


Elastic- My machine measures approx 23", so I cut my elastic at 20". It needs to be long enough to fit with a slight stretch.

 Start with the strips!

take your 2.5" x 5" strip. Fold in half along the length, WRONG sides together. Press. You now have a strip 1.25" x 5". Fold the raw edges in to the centre fold, and press.  The strip now measures 5/8" x 5".
Stitch close to each long edge.

Set aside.


Take your long strip, Fold along its length, RIGHT sides together, and stitch with a 1/4" seam. Turn Right sides out.
Now take your elastic, and attach a smallish safety pin to each end. Thread your elastic into the tube, and as the back end is trying to disappear into it, use that safety pin to attach it at that end, while you get the rest threaded through... The beauty of this is, if you lose the end up the tube, you will be able to retrieve it without pulling it right through and starting again...

You now have a piece of elastic inside a bunched up tube.
Machine stitch across both ends to anchor it firmly, remove safety pins, and then stretch the elastic and the tube, until the tube is full length, and let go, This should have distributed the excess evenly, to give a pretty ruffled effect.

Now you need to put ends on so you can fasten it.. This is what I do, but feel free to vary it, and use sewn poppers ( snap fasteners) or 'velcro'.

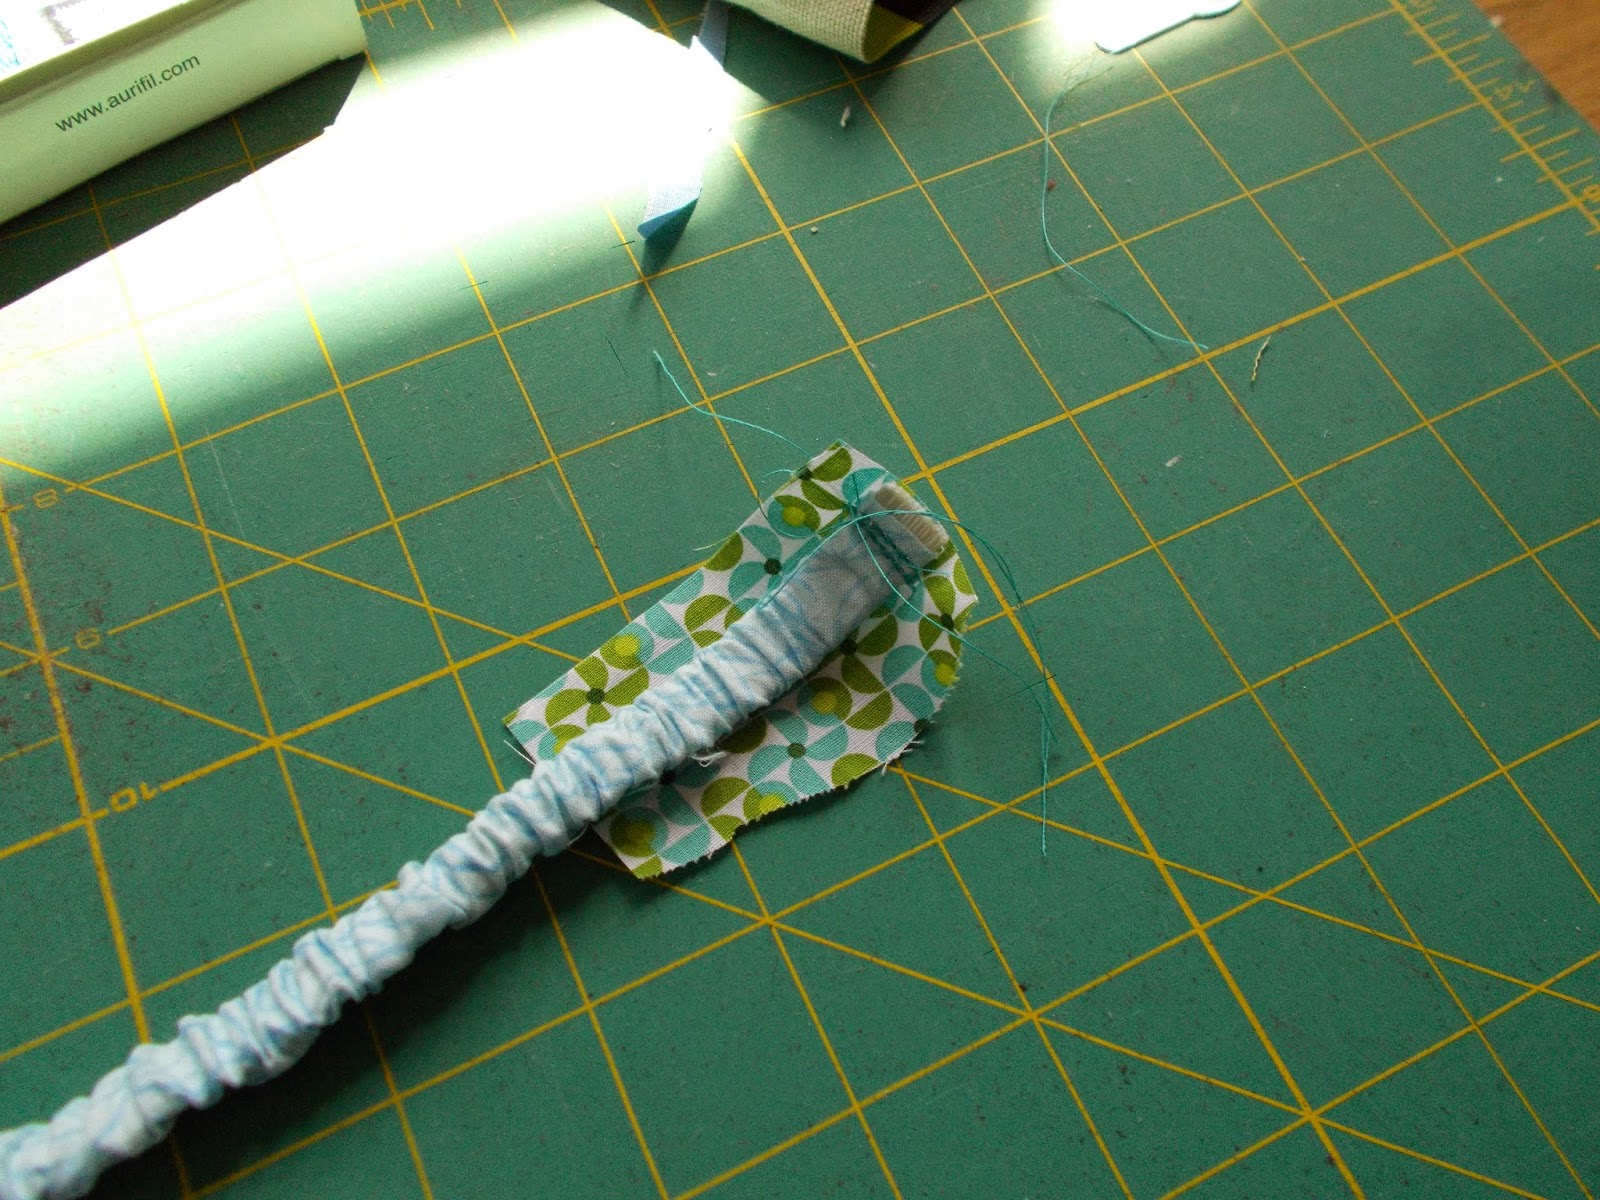
Cut two pieces of scrap, a little over 1/2" wider than your elastic strip, and about 3" long.

 Place the elastic strip on the end tab, as shown,


 Sew firmly in place. Turn it up the other way, and press.


Now take your offcut of wadding, and mark a piece the width of your elastic, and cut.


Tuck the end under the fold, and carefully press the sides in, to enclose the edges of the wadding, and the end over a little,


I use a needle to help get a neat fold over here, fold over and press, the stitch neatly in place.
and repeat for the other end.

I then attach 'kam snaps' as fasteners, they are quick and easy, and seem secure. Please attach whichever fastener you find easiest.


Set aside.

Pincushion. 


Place strips 2.5" x 5" right sides together, Stitch one long side with 1/4" seam allowance.  Press open your preferred way.
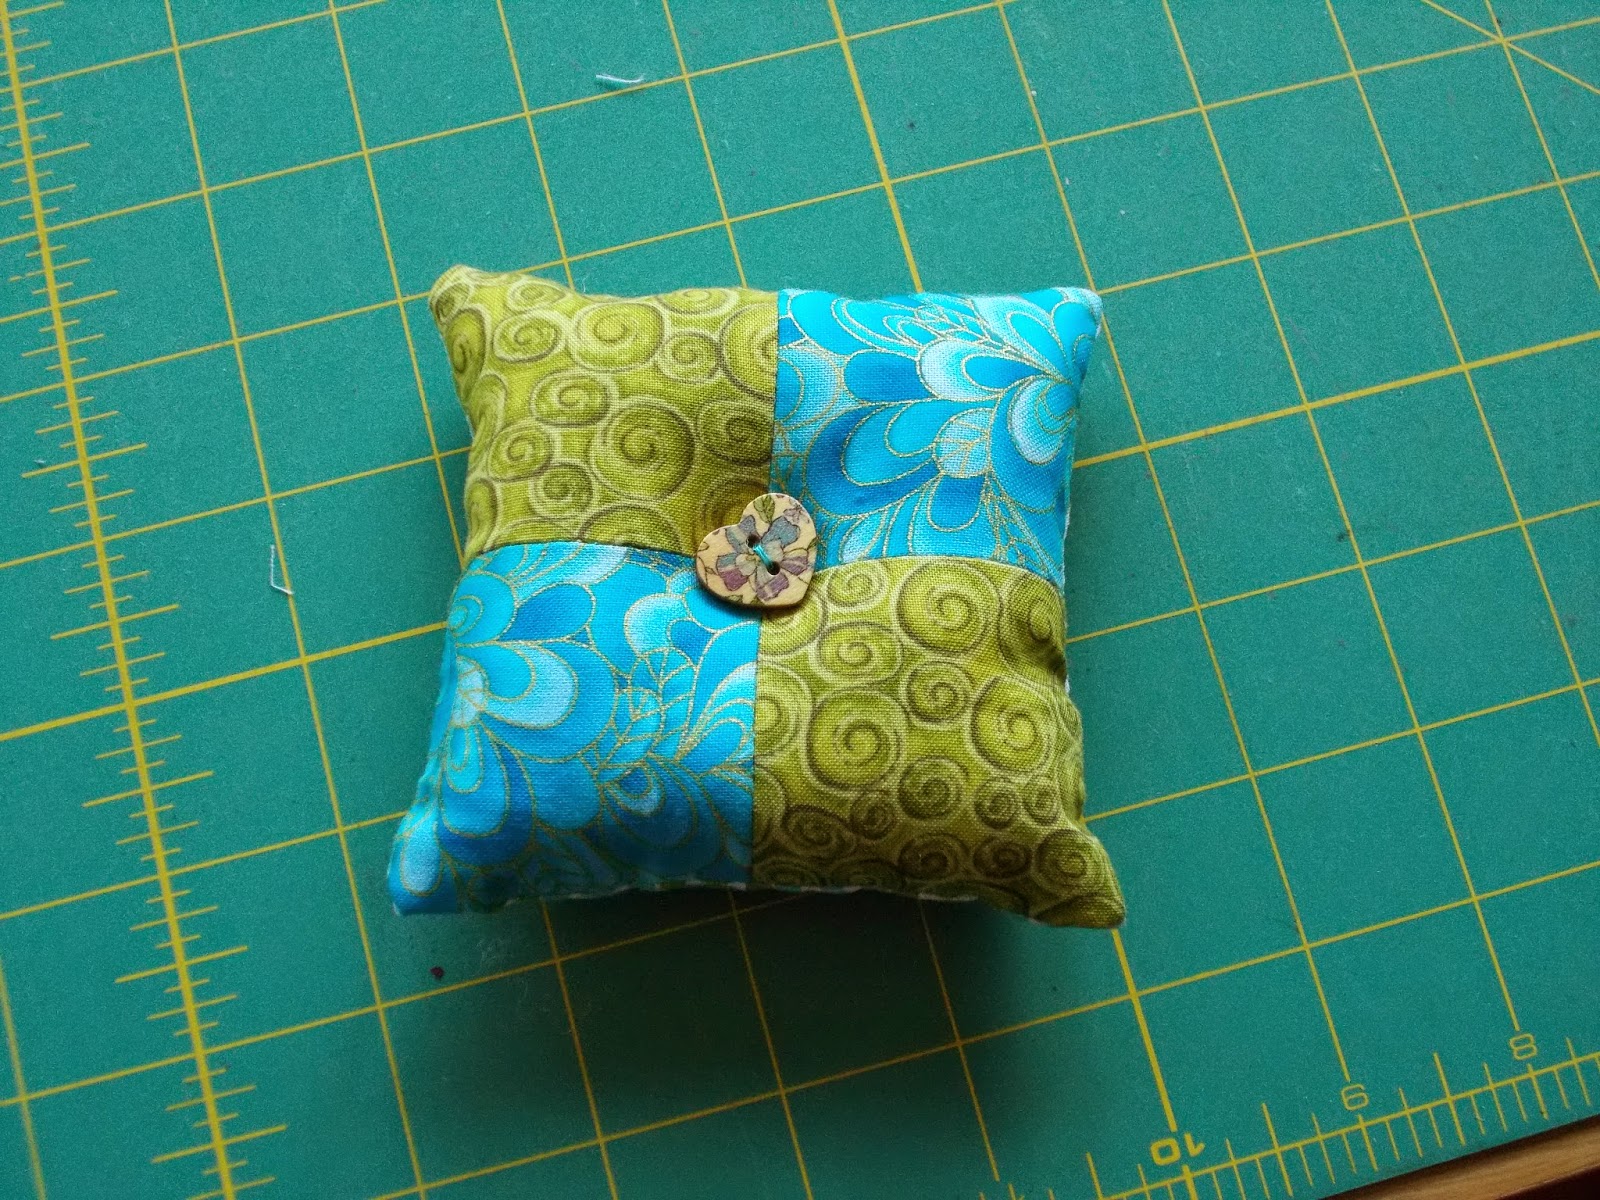
Now cut 2.5" off one end, turn and place right sides together, and stitch to make a four patch. Press open.


Now take the short strip you made, and place on the right side of your 4.5" square, not quite centrally, as below.


Stitch the ends in place, there should be some 'spare' at the ends..


Now place the four patch face down on top of this.
Sew, starting part way across one of the sides, and remembering to do your back stitches at the start, round all sides, but leaving a 2" gap, for turning and stuffing! Back stitch at the end.


Turn through the gap you have left, the strip will help if you get hold of that, and poke corners out quite neatly.
Now stuff it fairly solid!

Hand stitch the gap shut, and sew the button centrally .


You may find this slips over your hand quite neatly when required, Just be careful of the pins sticking out the other side...


You can now attach the pincushion to your machine in the best position for yourself,


If you would like to have one of these made by me, please leave a comment at the end- I am willing to ship wherever, -just tell me which two colours you would prefer!

and feel free to pass the message on, if you wish!

One lucky (?) person will get chosen at random on the 25th, in the evening!

Saturday, 22 February 2014

Poppy Bag

It is finished, so it can now go to be raffled.. I am quite pleased with the result- not perfect, what ever is? But, a result!
 Kindly modeled by DD2,   first side,


Second side,


and, of course, a zippy pocket. and a thingywhatsit to clip a keyring onto..
And we are done! Yeay!

Edited to add  And, as this was made to order- a poppy bag for a prize- I am linking up to le Challenge  for this month!

go see what the others are!


Now. Anyone very sharp eyed will see my usual guddle going on,  and kindly look the other way..but in amongst it is a magazine, and a pretty pink padded envelope.. 


You see, I am a winner! 

Lovely Amy had a giveaway, and as her prize sent out that magazine,  a whole bunch of pretty scrappy bits, a good couple of fat quarters worth, some chocolate, and a 'finger pincushion'. Complete with pretty pins!Want a look-see? 


Look at all she sent! Amn't I the lucky one?!


Thank you Amy!

Wednesday, 8 August 2012

Postman knocking!

Oh it has been exciting!
I have been containing myself with difficulty, waiting for some post to arrive.

Let us go back in time a little. No, a little further than that! And a little further- no stop! not quite that far!

I have a set of cousins in Australia. Scattered about, but over there. About as far away from me as they could get! Then introduce Skype! And two Sundays ago, I was chatting to my eldest Coz, for about an hour.
Now, in 1999 he visited this country, to see his Mum. And we visited whilst he was there. When I was small I would have followed him like a little dog, given half the chance. My lovely, soft big Coz! well, he is still big, and still soppy and soft! And lovely. Just older! He had a video camera, with autofocus and zoom and all sorts. And he took videos on that visit! Chatting on Skype, he remembered.

So, he edited them, and sent me a copy, which arrived today.
Have you watched a video, 13 years later, having never seen it before?
I can tell you, I didn't recognise my own children! My 19 year old back to 6 years old! My 22 year old, is now 9! and my son is only 11, with his voice starting to change. I never noticed at the time, but on the video, it is obvious. And do I still sound like that? I don't know, but I don't think I sound like that to me!

happy post!


But that was not all! As you know, I have been participating in the Frame Purse Swap. A lot of folk had already received their purses, Certainly, my purse had arrived safe and sound, at it's destination. And today, the purse for me arrived!

A big box!
 But well filled! I thought the brief was a SMALL something to go in the purse!
 But somehow some extra fabric has found it's own way into the box!
 Did you see these cute birdie buttons?
 And a fat puffy pincushion is inside- no room for anything else, with that fattipuff....
 Gorgeous back as well,

 Oh there was room for a little something else!

But where did all those goodies come from?


who could tell?


What wonderful fairy sent these?


I think there is a slight clue on the card!


Now amn't I the lucky one!


Thank you Rhonda, you are a star!


Related Posts Plugin for WordPress, Blogger...

Popular Posts