Saturday, 24 October 2020

Missing in the post.


In the summer, friends of ours were celebrating their Ruby anniversary. We were invited, by the organisers, their children, to attend the celebration. Then Coronavirus hit! No celebration. Oh. 
There is, however, no reason to not make and post a gift. 


This is a reiteration, with variation, of course, of another friend's Ruby Wedding gift. This is what came out of my sewing room


The back is modern, and simple. 


The front is more detailed


So, you then wrap and post it, with a letter, somewhat later than you should because the ooomph to get it done is absent, and you sit back and await news of its arrival. 

And it does not arrive. 

Posted first class, and now the Royal Mail have lost it. It is not the first time the Royal Mail have lost my packages. I have even stopped using one post office in particular because so many of my postings have gone astray. This was not from that one, but again it is lost. Tracking tells me that it will update once delivery has been attempted. 

I can, of course claim 'compensation' Except that they require proof of value. And a hand created special gift will not have a receipt that you can handily take a photo of. So, no possible compensation. Of course, what I want is for the gift to arrive. I do not really wish for compensation, I really wish that someone out there in the sorting offices would find and deliver the parcel. No way to request that on the website. 


I had seen a drunkards path variation on the internet, and I have cutters for Drunkards path, so I thought I would have a bash at it. I have learnt from this one and would trim my blocks rather more if I did this again. The challenge was in the working out the first version though, so I doubt I would do this again.

Quite pretty though. 


Tuesday, 19 May 2020

A special gift

I have had so much support lately, from a lovely aunt, always thought of as my 'pretty auntie' when I was small- she gave me a few books for my eighth birthday- Beloved books- Little House in the Big Woods, The Incredible Adventures of Professor Branestawm, and John Masefields The Midnight Folk. She also included an invitation to be a founder member of the Puffin Club. I think it cost 5 shillings, and I had to get a postal order to send off, but I received my Puffin Posts for years. I still have them! She and I have been a mutual support system. Yes, my children, and husband have been excellent, but her children are all boys. So, we have leaned on one another a little.
So among various emails I slowly got inspired, and on Sunday I sat with a rough ( very rough ) plan to make a bag for her.


Very quickly this happened
I mentioned little ends of spools, which are clearly not big enough to go on the machine? Well, some of them went- on the machine!  You see  the ends of those petals? They have been played with by my machine, to give an extra dimension


And this now becomes part of a pocket panel. I couldn't ask about preferred colours, after all, this will be a surprise for her- so, she is getting green!

All had to come from stash, as it was a Sunday, and I wanted to just get on with it. With coronavirus, fabric shops are basically shut, you can buy online , but not go and get the stuff. I was pleasantly surprised that I had enough that co-ordinated well enough to do the whole thing. 


A zip pocket put in, I liked the lilac zip- a little quirk?  and piping above and below the panel

A pretty leafy pocket lining, with the label in,

and then that panel incorporated into the front of the bag


 a gentle anount of quilting- Keep the back fairly plain
 and put on a tab for fastening
 linings had to be pieced, but these went well together
 a small slip pocket to take a phone if needed

covered button to fasten that tab


I even managed to remember to put in the loop for a key fob to be popped in. 
This now needs to go in the post. 
And that was my whole Sunday gone!

Happy days. 


Sunday, 17 May 2020

When do you throw it away?


Don't tell anyone, but I had a tidy up. No it looks worse, because I am halfway through, however,

I was sorting spools of thread, and I seem to have quite a few 'nearly' spools. These are clearly too little left to go back on the machine, ( though I have done it before...)  so how far down do they have to be to just get rid? Or do I keep them indefinitely just in case I want that one for hand sewing?

When do you get rid?

I am still expecting to keep all these. Madness still runs in this quarter!

Saturday, 16 May 2020

I made it!

For some time I have been aware of the absence of a drop cover to go over my sewing machine. My daughter's machines have them supplied, but my machine came with a carry bag, which is brilliant, but doesn't function as a cover you can just stick on when you stop sewing for the moment.

I also have a promise to myself, that at some point I will attempt to become reasonably capable of free motion quilting. I have dabbled for years, but truth to tell, you have to practice, like with other skills, in order to be able to actually produce a half way acceptable result.

With current conditions - coronavirus-I am spending a bit more time at home,so perhaps now is a reasonable time to actually do something about it?

I had spotted a tutorial on Youtube, which was really easy to follow and did the thinking for me. You may not want the thinking done for you, but when I am feeling brainless, it is lovely to have someone tell me what to do. Just some of the time.
Luckily I found suitable fabric in my stash. Would't it be frustrating if you got that urge and there was nothing you wanted to use that way?

So I made my template, made the pieces, put on a couple of sensible pockets, and done!


 This rich dark red, printed in gold, it was picked up at Abakhan some time ago, as being too useful looking to leave behind, And rich and pretty looking. It never occurred to me at the time, I would use it for me!

The kimonos on thie panel are part of a sheet of kimonos. Again, serendipity, I had not realised these fabrics, bought at different times, would work so beautifully together. 
Having attached kimonos to red, I sandwiched with plain white on the back, and cut side panels without the kimonos, and got to the scary bit. FMQ. 

This one was the starter. And boy, does it show. I had no clear idea what I was going to end up with, or where I was going with it. I knew that I would get a smoother result by going a bit more quickly, but how quickly is a bit more ? And you can see my strange meander is just that, strange. But this is warts and all, and everyone has some things that aren't quite, well, quite. 
Having done this I felt a bit more as if I might get somewhere- No way am I ripping it out, no matter how awful, and starting again, so this will be there to remind me how I can get something randomly dreadful, move on!


So then I did side two. I know it is not perfect, but I am a LOT happier with this one. The pattern emerging reminds me of tree bark. It is organic and flows . Yes there are plenty of hiccups, and I realise I need to stop the machine only when I want to change a direction radically, as I will get a jerk whenever I do stop. I think it will not be obvious to the uninitiated that there are loads of jumpy jerks there. I know, you know, but except for the quilt police, no-one else will know. 


So then, the main panel. I wasn't going to do my tree bark over my kimonos, so I just did the lines between the little panels, to keep everything together and left it at that. Tree bark on the rest. 
Don't judge me on the mess on the floor. I still say, he who never makes a mess, never makes anything else either!


A full width pocket on the back. I can slot my standard flat bed in there. 
An elastic topped gathered pocket on the side panel- the one with the grotty quilting- for in case I need it. Overlock everything and bind the bottom edges


 The sides are then bound to the main body. I added a slot in the top to grab the handle by, for if I need to lift it.

 Amn't I posh?


What would I do differently?
I would make the binding for the attachment of the side panels to the main a little wider. Instead of 2" strips, I would try 2.5". This would let me cover the layers at the bottom corners more readily.
I would also make the whole thing about 1" shorter, It is a tad too long. It is not an issue worth taking apart for, but it is unnecessarily tall.

The details for those who like them
Outer fabrics from Abakhan, white lining from Black Sheep, wadding from festival of quilts 2 years ago. It is iron on double sided wadding, which I love. No it does not iron on firmly at all, but just enough to keep it stable, but you can peel it off quite easily. And yes BOTH sides are 'iron-on-able'
Which is now a word. Official. Yes.
Thread used was all Gutermann, apart from the overlocker. The quilting was done with Sulky 02776, weight 30.


I am reasonably happy, but I now need another FMQ project to keep up the practice.
Any ideas?


Saturday, 9 May 2020

Lockdown has some benefits?

I have been absent for some time. Most folks know that we have had trying times and sewing has been very low on the priorities. Sadly.

More sadly, my responsibilities have reduced and I am finally able to start sewing, and to enjoy the sewing. Only a few little fairly straightforward projects, but it is a start.

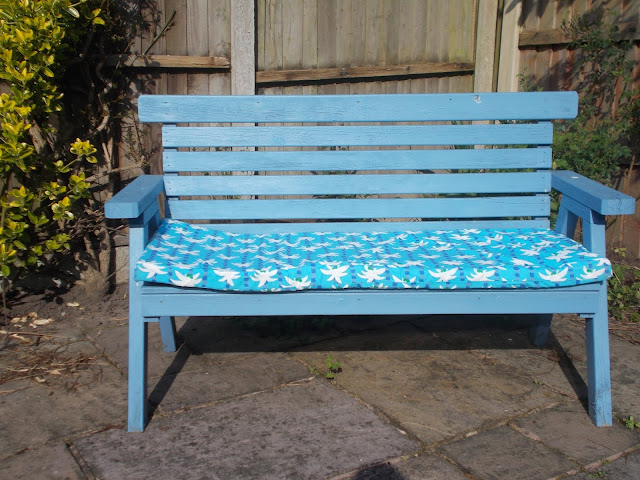
Last summer my DD2 and I painted our garden bench, a pretty shade of blue. And the next thing was, it needed a seat cushion. Luckily- or not so luckily, the weather took a turn for the worse, and sitting out became a non starter. This year, as good weather began, I finally made the cushion!


The fabric is one I was given, as 'spare', by a friend. It was bought in IKEA many years ago, and there is a shade of blue in it which matches the bench beautifully. 
I may say there has been more bench sitting this year than I can ever recall.  Yay! for seat cushions. The weather helps, of course! Though on Thursday I was up sewing and heard the rain begin! We had one of those drenching downpours, which caused me to race down the stairs and out to retrieve the cushion, in bare feet! No harm done, and the comfort is excellent. Thanks Jan!

Some years ago, I made a bag for work. This bag has had daily treks to and from work, trips overseas and has generally been ubiquitous,. Everywhere I went, so did my orange bag. In the fullness of time, the strap started to wear, and the wear got worse, and really the bag needed to retire. 
For that to happen I needed a new bag. 


Tadaaa!


I will say I was very happy with my pattern matching on the front, that flap really does have a good match on the elephants. 

and on the back I quilted round the elephants.
 Who doesn't love an elephant?


I had also promised my DD2 another simple coin purse. It is one of those things that you promise and then it doesn't quite happen... Finally it has.
I found a pattern on pinterest, ( free, good price point!) and did it. Simple, easy to follow instruction, though the instruction wanted me to hand sew the lining in place.

Well, you know me and hand sewing...

Of course it can be done on the machine.

The first one I tried to make it by sandwiching the zip between the lining and the outer. It got complicated and fiddly, yes, it worked but I still ended up with a little hand sewing, but it was OK. That was the pretty turquoisey one with the yellow zip.

I had to have another go, though. So the dark red one also had to happen. This time I did make the lining up separately, but I topstitched the lining into place with the machine. No hand sewing at all- or anyway, just hiding my ends.


So this pretty pair have been adopted by DD2.
I am now considering my next project.


And what are you up to?


Technical bits Elephant fabric- Abakhan
Pink linen- Abakhan
Zips- JaycottsTurquoise fabric for purse Minerva
others- no idea!
Related Posts Plugin for WordPress, Blogger...

Popular Posts